Resource icon

[Open Assets] Blender template for rendering SRB2 sprites 2.1

This content may be freely modified and/or maintained by anyone.

Sparkette

Member
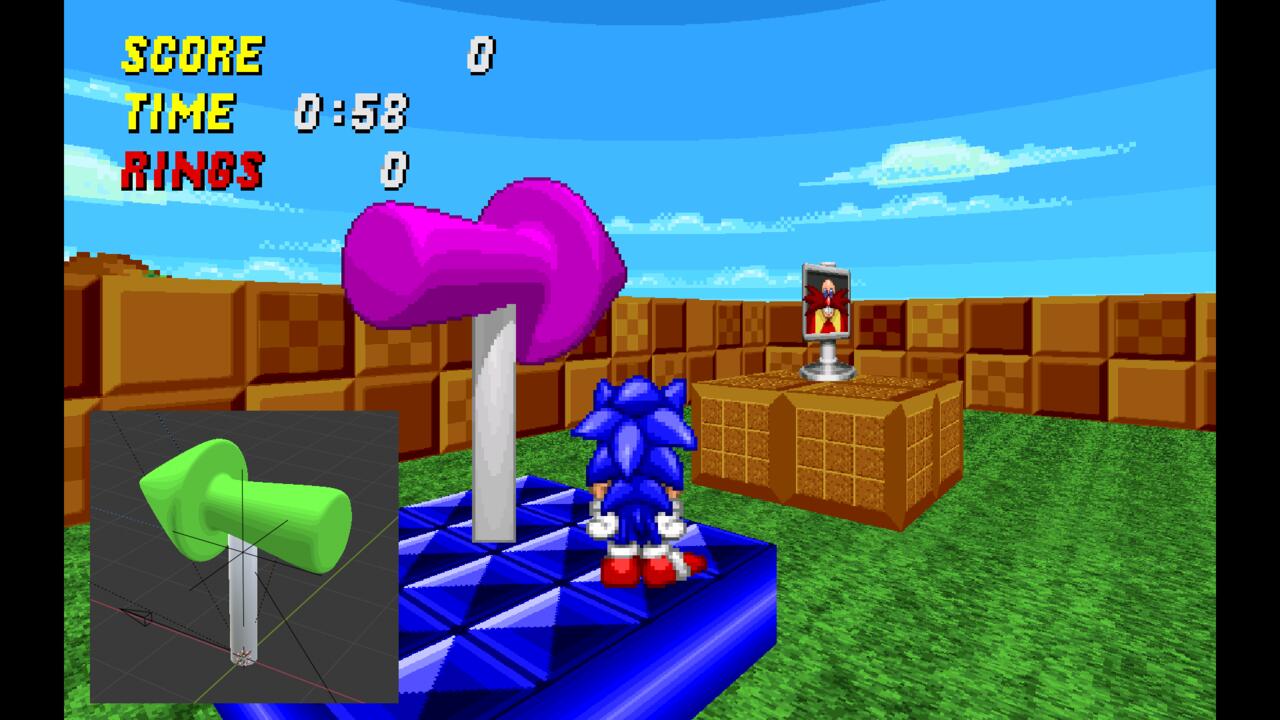
I created this as an alternative to drawing each angle of a sprite manually. If you're skilled with 3D modeling, you can use this template to create (what I think are) pretty decent looking sprites for SRB2.


attachment.php

Included is the .blend file, instructions for using it, and a demo WAD, so you can see the area from the above screenshot in-game. Note that the color is different in the screenshot because the example model uses a material designed to render using only colors in the skin color range.

I hope you find this helpful!
 

Attachments

  • screenshot.jpg
    screenshot.jpg
    111.5 KB · Views: 16,712
  • SRB2Blender.zip
    135.1 KB · Views: 1,365
Last edited:
I had heard of Blender adding support for pixel-art shading, but I never thought it would look this spicy. With enough patience, I bet people can even churn out full character wads that actually look really nice! ...or they can just update Sonic's Schoolhouse to 2.2 standards. Anyway, huge fan of this.

Additionally, for python-savvy people, this attachment allows you to rename exported sprites quickly, provided you exported them with the intended 4 letter prefix. "python nameswap.py <prefix> <anglecount>".
 

Attachments

  • nameswap.zip
    562 bytes · Views: 466
I'm really excited about this development! I can already see some cool stuff coming from this tool, perhaps a rendered character that doesn't look like it came straight out of a bootleg SNES game. Good stuff!

...or they can just update Sonic's Schoolhouse to 2.2 standards.

You know you want it.
 
Thanks for the script!

And yeah, I was also surprised how well it turned out. BTW, here's something I made as a test. Feel free to use it if you want.
 

Attachments

  • anim.gif
    anim.gif
    21.9 KB · Views: 815
I have used Blender for 15 years now so this is right in my wheelhouse. I only had to add the .blend file to my ever growing number of scenes (in its own folder to separate it of course).

Allow me to suggest a little optimization for the presentation, Blender has a text editor, so you could've put the instructions in as a text datablock. I took a look at the setup and everything appears to be fairly straightforward. To others here, I would recommend going through the official docs. first if you're just starting with 3D, Blender 2.8x has made strides in ease-of-use, but a DCC app. by its nature will be more complex than your favorite spriting software.
 
Last edited:
I have used Blender for 15 years now so this is right in my wheelhouse. I only had to add the .blend file to my ever growing number of scenes (in its own folder to separate it of course).

Allow me to suggest a little optimization for the presentation, Blender has a text editor, so you could've put the instructions in as a text datablock. I took a look at the setup and everything appears to be fairly straightforward. To others here, I would recommend going through the official docs. first if you're just starting with 3D, Blender 2.8x has made strides in ease-of-use, but a DCC app. by its nature will be more complex than your favorite spriting software.


I considered doing that, but decided against it because it could be tricky to explain how to close the text window. Having a separate file is easy enough.
 
Makes me wonder - would it also be possible to have this automatically output an MD3 with the animations in it, and accompanying models.dat line so you get a model for openGL to use alongside the prerender?

It's a small thing, perhaps, considering you'd already have the model and animations in the first place to use this tool, but it'd sure be convenient to just have it do the conversion for you at the same time.
 
Last edited:
Not sure, might be possible.


Also, I was experimenting with the outline effect, and figured out how to get it to apply based on changes in depth, not just edges. Which do you think looks better?

Original on left, newer version on right:


attachment.php
attachment.php


The difference is most apparent on this frame:


attachment.php


I've attached that version of the Blender project file (in SRB2-v1.1a.zip) in case you want to experiment with it; see the Compositing tab at the top.
 

Attachments

  • before.gif
    before.gif
    25.5 KB · Views: 7,009
  • after.gif
    after.gif
    29.1 KB · Views: 7,081
  • ss_0001.png
    ss_0001.png
    4.2 KB · Views: 7,088
  • SRB2-v1.1a.zip
    132.7 KB · Views: 420
Last edited:
Not sure, might be possible.
Python should give you what you need to create an addon that encodes an animated model to the .md3 spec. (as there have been many exporters created for Blender over the years).

I do not know how the spec. works myself so I can't help with that, but it shouldn't be as complex as various modern formats like Alembic, USD and GlTF.
 
Been working at that setup, and I think being able to use Blender to create sprite assets will be a huge deal, especially if you want to make those newly supported 16-directional ones like seen here.
LWZ-GIF9.gif

This is especially so if you want your custom sprite objects animated, an asset that potentially means days of pixel pushing (with many revisions) can now be done in just one or two hours (with few revisions).

I also have a clock asset with 3 frames for a total of 48 unique sprites total. If you upgrade an asset from 8 directions, it actually takes longer to tweak the names so they are correct.


I definitely feel like the one on the right is the way to go. Compare it to how Sonic's middle head spike is drawn from the back--it's got a visible outline. That aside I feel like the depth is more apparent in the sprite on the right. The one on the left looks more like it could be a lollipop or a green disc rather than the back of something longer.
 
Something else to consider is that the example output, that arrow sign, has a stylistic inconsistency with the rest of SRB2 in how it's not taking into account vertical perspective. A lot of older sprites did a purely orthographic perspective, but stuff has moved away from that a lot, especially in 2.2 - nowadays things are generally sprited with an eye for where they'll vertically be relative to the default camera, which you can especially see with the new spring sprites compared to the old ones.

But mostly, the stand-out thing is that the base of that pole is just a straight horizontal line instead of being curved down into a cylinder.

Basically, you may need to add in some options to tweak how perspective works, especially vertical perspective - where it's centered, etc.

Or maybe I'm just completely off my rocker about what's actually happening there and the pole's base lacks perspective for some completely different reason, lmao.
 
Last edited:
Have you tried moving the camera up and down? It mentions that in the readme. That's what you're talking about, right?
Actually, your specific example, about the base being a straight line, seems to just be an artifact of the render resolution. It appears curved in Blender from the camera view (press 0 on the numpad to see) but it doesn't render that way because it's too shallow of a curve.
I think I set the focal length much too high, at 170mm. Here's what it looks like after changing it to 50mm (and moving the camera closer to compensate.)
attachment.php
 

Attachments

  • 50mm.gif
    50mm.gif
    27.7 KB · Views: 6,045
Last edited:
Just an update on my use, I began looking at the Python script to automatically rename objects already rendered and I found it apparently does not work with the latest builds of Blender 2.90, so I ended up rewriting much of the script and now it looks like this. It is doing names for a custom 16-directional animated custom crawla object (base name YOSS) as an example. Do note the filepath was altered slightly for privacy purposes.
Code:
import os, sys
import math
from pathlib import Path

pref = "YOSS"
angcount = 16

target = Path('C:/Users/-----/Documents\Blender texture image stuff\Textures\Textures\Low-fi\Sprites\YellowCrawla')
dirs = os.listdir(target)

letterdict = dict({
    1: ["0"],
    5 : ["1","28","37","46","5"],
    8 : ["1","2","3","4","5","6","7","8"],
    9 : ["1", "9G", "28", "AF", "37", "BE", "46", "CD", "5"],
    16 : ["1", "9", "2", "A", "3", "B", "4", "C", "5", "D", "6", "E", "7", "F", "8", "G"]
})

startchar = 'A'

for file in dirs:
    if file.startswith(pref):
        
        imagenumber = dirs.index(file)
        letters = list(letterdict[16])
        suffix = letters[int(imagenumber%16)]
        
        if imagenumber == 16:
            startchar = 'B'
        elif imagenumber == 16*2:
            startchar = 'C'
        elif imagenumber == 16*3:
            startchar = 'D'
        elif imagenumber == 16*4:
            startchar = 'E'
        elif imagenumber == 16*5:
            startchar = 'F'
        elif imagenumber == 16*6:
            startchar = 'G'
        elif imagenumber == 16*7:
            startchar = 'H'
        elif imagenumber == 16*8:
            startchar = 'I'
        elif imagenumber == 16*9:
            startchar = 'J'
        elif imagenumber == 16*10:
            startchar = 'K'
        elif imagenumber == 16*11:
            startchar = 'L'
        elif imagenumber == 16*12:
            startchar = 'M'
        elif imagenumber == 16*13:
            startchar = 'N'
        elif imagenumber == 16*14:
            startchar = 'O'
        elif imagenumber == 16*15:
            startchar = 'P'
        elif imagenumber == 16*16:
            startchar = 'Q'
        elif imagenumber == 16*17:
            startchar = 'R'
        elif imagenumber == 16*18:
            startchar = 'S'
        elif imagenumber == 16*19:
            startchar = 'T'
        elif imagenumber == 16*20:
            startchar = 'U'
        elif imagenumber == 16*21:
            startchar = 'V'
        elif imagenumber == 16*22:
            startchar = 'W'
        elif imagenumber == 16*23:
            startchar = 'X'
        elif imagenumber == 16*24:
            startchar = 'Y'
        elif imagenumber == 16*25:
            startchar = 'Z'
        elif imagenumber >= 16*26:
            print('too many frames')
                    
        targetpath = os.path.join(target,os.path.relpath(file))
        
        newname = pref+startchar+str(suffix)+str('.png')
        newpath = Path(str(target)+("/")+str(newname))
        print(newpath)
        
        if not os.path.exists(newpath):
            os.rename(targetpath,newpath)
        else:
            print('file already exists, doing nothing')
It was nice to see when the game accepted the 176 images it renamed, so getting them ready was just a few button clicks in SLADE. I even fixed a couple of warnings since there was apparently a mistype or two the first time around. This will be really important if I was to ever start reskinning the bosses (which would have a lot more images).
 
Material Problem

Umm... the materials aren't showing up. Only the playercolor and blank materials are showing up. This is true for 1.1 and 1.1a. Can you help? (EDIT ; I'm on 2.8.3 for LINUX. Lubuntu specifically)
 
Last edited:
I can't seem to import pre-made models using this. I've checked all the drop-down menus at the top. Maybe it's just my lack of experience with Blender?
 
I have installed the template and I couldn't find the features the template has added. I have been searching in the menus alot and didn't find anything renewed. Have an update for this script in Blender 2.90.1 (Windows)
 

Who is viewing this thread (Total: 0, Members: 0, Guests: 0)

Back
Top